
Loom Design/Warping/Tutorial
No, of course, preparing a warping for a loin loom isn't done within 16 seconds! It takes hours, as it takes time to prepare the warping for a frame loom. If you have no experience, try first the frame loom method. With some few modifications of this technique, you can also prepare the warp for a loin loom.
Here you get 16 seconds to watch, 16 minutes to read and about 16 hours to prepare your first Austro-asiatic Karen-like warping!
There are at least 4 basically differing methods, used by the Austronesian and Austro-asiatic tribes to prepare a warping for loin looms (backstrap looms).
1) Vertically - externally-tensioned by a frame (single person)
2) Horizontally - externally-tensioned by a frame (single person)
3) Horizontally - externally-tensioned by stakes (single person)
4) Horizontally - body-tensioned by weaver, (two people)
Katu people in Laos use two rails for a horizontal warping, while the Mishmi people in the Seven SIster States prepare their horizontal warping method by two people (the weaver becomes part of frame). The Karbi people do their horizontal weaving by the support of external stakes for the breast beam. For this demonstration we use the popular vertical method by the support of a warping stem like Karen or Chakma people do!

The Connector
The first rod, you can watch me, looping the thread around, is the bind rod (or connector). This rod is no must, more a option, but very useful for a circular warp. In case, you use just one colour for your warp, you may leave it away. If you add a second colour to your warp, you have to swop the thread at this place. Most easy option at this place is to cut the last thread and connect it to the next thread by a fine knot and go on for the next round. This option leaves the threads independently, what has its opportunities!
2nd option
Another option is the use of this bind stick. To change colour you cut again your last threads and bind it straight to that bind rod. In case in the next round you want to go on with this colour, you just turn the thread once around the rod and go on with the same thread for the next round. Due to the connection of your ending threads to the rod, it will stick at its place in the warp, you can't get off the warp anymore until finishing your weaving! That has again its own quality, in some cases you need it, in others you want to get rid of it.
3rd option
So, there is another option, mixing up both techniques, I showed you before! This option leaves the bind rod flexible, so you can move its place within the warp later on while weaving! You bind the endings of both threads to each other by a fine knot and then you turn the thread once around the rod. You may even leave it away while this warping process, and add it afterwards!
As you are familiar with the components of a loin loom, you may discover, that this method is similar to a coil rod, and indeed, it is! It is THE other coil rod, the pendant of the upper regular one, close above your shed roll! These two "coil rods" interact, building the frame of your actual weaving screen and keeping the width of your warp within this field (by adding the support of a width-holder later on at your actual weaving point)!
Let's start here!
There are good reasons for each option! Most methods include more than one property, you use it for! So, you have to know, that this place, where you insert your bind rod into the warp, is actually the place, you will start your weaving later on! So next to its function to connect your threads here, this stick enables you to control and keep the desired width of your warp while weaving!
So, the use or non-use of a connector is a essential thing to understand, it makes the difference of a western-style flat warp and a eastern-style circular warp! The flat warp offers a natural starting point (connector) by the breast beam your warp starts at. This starting point is naturally missing within a circular warp!
The Heddle Construction Place
The next following rod, you may discover behind the connector, is the heddle bar! Not easy to recognise, as it is almost hidden behind the shed roll. In this situation the shed roll of your loom is used to control the size of your heddle loops. Here is one of the great differences between frame loom warping and the preparation of a warp for loin looms: The heddles are worked into the warp while warping. The method for frame looms does this afterwards while beaming! A shed roll of 5 cm in diameter isn't just great for the shed size, but fits perfectly to determine the size of your heddles!
Watch close to discover the white heddle thread, looping around the shed roll! This method works with just one thread looping all the way round and around to build all these needed heddles.Each loop you take the thread that's behind your heddle stick and loop with your heddle thread halfway-round the warp thread to lead it back over your shed roll (now heddle maker) to leave it there waiting for the next round. After warping is done, the shed roll is taken off and put onto its place in the warp.
Single heddles
It seems easy, but in the beginning, with no experience, you may end up with a lot of problems to manage this one-thread-all-heddles-method. Best you prepare yourself single heddles, each same size (5 cm!?), but this takes much more time, anyway you will re-use them for your next warp, so it's not wasted! But in this case, we come to another problem: You have to leave the heddle construction off the warping procedure, and add it afterwards, because you won't get it managed to insert the shed roll that way. Anyway for this single-heddles-method you better work horizontally. On this way you can choose each thread like playing a harp to insert the shed roll step by step for measurement.
The Coil Rod
The following rod you may observe behind the heddle construction place, is the coil rod. Threads are each once around the rod to go on. As told above, this coil rod builds the upper frame of your weaving screen and keeps the warp in order and desired width!
The Warp Beam
Last and least at the right end side comes the warp beam, where the threads loop back! Its pendant on the left end side is the breast beam! Here the threads just loop back and are no way connected to the beam. That leads to the possibility of circular warps to swop from one loom to the other. This property is very useful to produce ikat, a special Austronesian thread colouring method, that goes along with the loin loom!
Even they are ways to produce ikat on frame looms, to do authentic ikat you need a loin loom with its authentic circular warp method!
Where is the Shed Roll?
When your first fascination for this warping method turns focus into details, you may ask yourself: "Where is the shed roll?" Of course, you can see the shed roll, me too! But as told above, in this situation it takes the function to control the heddle size.
The place to re-insert the shed roll later on again into the warp is between the heddle construction place and the coil rod. In this experiment I left if off the process, to insert it later separately! To insert this shed maker into the process you need to add another stick at this place between to complete the warping method of the Karen people. After the warping is finished, you are going to exchange it with the shed roll! At this place one thread goes behind the shed stick, the following one in front of the shed stick.
It's a great thing and offers lot of opportunities, to leave some details off the warping process, to add later on! It works with all components, the connector (if not knotted to the threads!), the heddle bar, the shed roll and the coil rod. If you need more than one heddle bar, it isn't recommended to add it into the process. Add them later after this process! Never more than one heddle bar in this process!
Strong attachment
My solution with the screw clamps isn't stable enough to stand the power of all these tiny threads of the warp, so i add a wooden strip on top of my warping construction, you won't find with the tribes' methods. The further the warping processes, the more warp beam and breast beam will tilt inward.
Sticks & Threads & Rock'n Roll!
You need a solution with less components or you want it more natural, more authentic? Then grab five sticks and at least two ropes, and follow the message of sticks'n threads! Drive your sticks into the ground between two trees or piles and connect your beams to the trees!
Summary
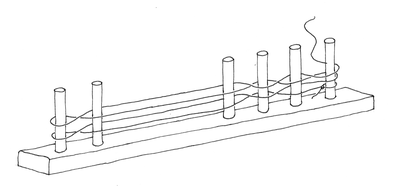
For a complete warping method like this you need five rods plus the shed roll for heddle construction! You may do with less, adding the others later on. At least warp beam and breast beam are a must, all other can be added later. If you need more than one heddle, you have to add them later. Just the knotted-to-the-threads version of bind rod needs to be inserted within this procedure! You may even try to manage the process in horizontal position, for example installed on a desk!
With this method you can prepare the warp for any loin loom, no matter, it's a Taiwanese, Bhutanese, Indonesian or whatever model. It's maybe not the authentic method, used by this tribe and its loom, but it works! You can even use it to prepare the warp for frame looms! Anyway you should be aware, that what we call a loin loom is actually just differing in the warping. The loin loom itself is a so-called beamed warp, that can be used for plain foot looms, loin looms or even to run a framed version.
Even this method as described is made for circular warp, with some modification you can use it to prepare a flat warp. While the preparing of circular warping concentrates only on the threads in the front to insert the needed rods, the preparing of a flat warp takes both, the threads in front and the threads in behind to form the warping. For example, A thread looped 100 times around between warp beam and breast beam leads to a circular warp with 100 threads, but to flat warp with 200 threads!


LOOM:DESIGN


Write a comment